

Filed in Business Planning, Business Strategy — January 20, 2021
How I Onboard New Clients Using HoneyBook
header 02


A really important part of your brand is the client experience. In fact, 90% of the client’s decision to stay with your company long term is made between your first TWO interactions with them. And in today’s busy environment, it’s all the more vital that you find a way to impress the heck out of those clients and make a lasting first impression that will rise above the noise of everyday business.
The best way to ensure a seamless and impressive client experience is to create it. I have carefully crafted my client onboarding and post launch experiences using a client relationship management tool called Honeybook. You can use any type of client relationship management (CRM) tool to create a client experience, but I have not found one better than Honeybook for a truly beautiful and enjoyable experience from the client’s perspective.
Today we will cover the tools and techniques I used within Honeybook to set up my client onboarding process and we will also cover how to create a Client Welcome Magazine and import it into Honeybook for a truly immersive first impression for new clients.
Honeybook client onboarding workflow
If you are new to Honeybook, you may not be aware of all the tools they offer. From website contact forms, workflows, email templates, invoicing, contracts, payment, and more, Honeybook is literally a one-stop shop for pretty much every client related process you would ever need. I do all my client work within Honeybook, meaning all my client interactions are within one system, which has really cut down on me trying to sift through hundreds of emails everyday. Everything I need is all right within reach and easy to manage for both me and the client. Let me show you a bit more how the system works and is set up.
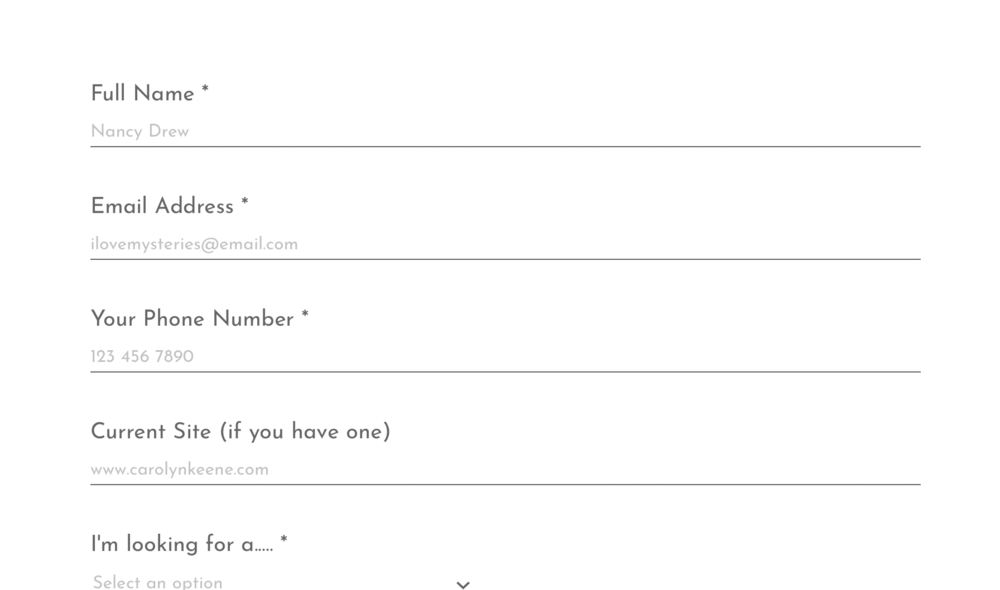
Step 1: The Client Inquires On Your Website
Instead of using the contact form from your website platform like Squarespace or Showit, I embed my customized and branded Honeybook form directly onto my Contact Page. This way I am able to ask the exact questions I want and the client is immediately added to my pipeline once they submit the form. It looks like this on the website:
Step 2: Send An Automatic Welcome Email
They are immediately sent a welcome email as part of my onboarding sequence. You can see that set up in the workflow here:

This email is sent without needing my personal input or time. It thanks them for their inquiry, invites them to schedule an initial call, and gives them some details about our company. This gives the client a great first impression and also saves me a ton of time from having to individually respond to online inquiries.
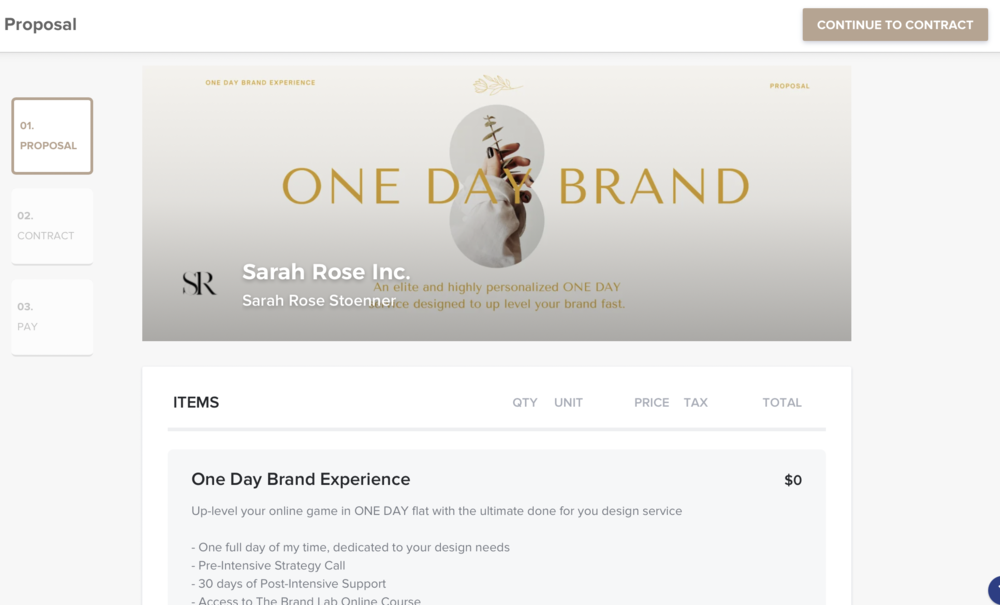
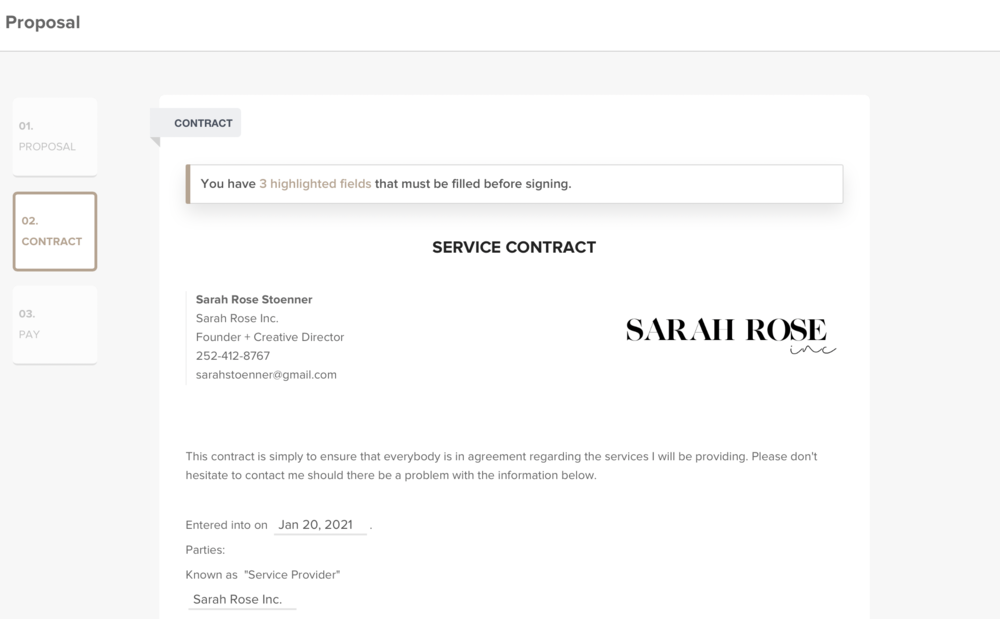
Step 3: Send Contract + Invoice
If after our initial call, the client and I decide to work together, the next step is to send out a formal proposal, invoice, and contract. All this is done through Honeybook (and Honeybook even connects with Quickbooks for making your books easier to manage!)
Within the proposal, everything is able to be branded to your business. You can also make payment arrangements and clients can set up their choice of payment and sign the contract right in the same place. You are notified of each step they take, so you know if they viewed your proposal, signed it, and paid.
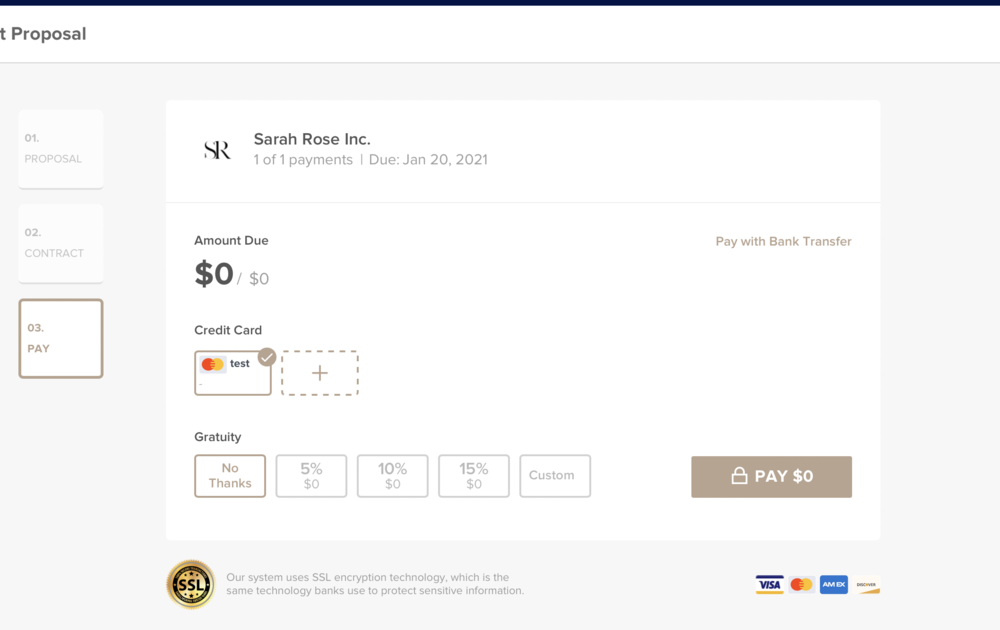
From the client’s end, the process is seamless. The reason I actually joined Honeybook is because I experienced it as a client and wanted to know what the vendor used to make such a beautiful experience! Here is what the client sees when they are sent the proposal:
After the client pays their invoice, the next step in the workflow is to send them a Client Welcome Magazine. In the next section, we will be diving into what a client welcome magazine is and how to set one up for your business.
Creating a client welcome magazine
The Client Welcome Magazine is a custom designed and branded reference for the new client. I have designed it as a way to give them a warm welcome, set the tone for the quality they can expect with our brand, and answer the questions they likely have since our first call. I have found that a lot of companies drop the ball at this part of a client process, since they feel they have “won” the client and no longer need to impress and this couldn’t be further from the truth. I believe that every step is important and a client should feel that from the first call to the final send off.
The parts I have included in my Welcome Magazine are:
-
Frequently Asked Questions
-
Instructions on How To Compile Content (part of our work together)
-
5 Tips for A Flawless Design Process
-
Overview of the Process + Schedule
What you might include in your Welcome Magazine will vary depending on what makes sense for you and your business. Our Welcome Magazine is created in InDesign and saved as a PDF. From there I imported it into Honeybook and save it as a brochure, so it is easy to send as an email to clients.
This is just the first four parts of my on-boarding sequence, which is 20 steps total! I also have created client off-boarding (or post-launch) sequences to create a great experience from start to finish! If you are interested in trying Honeybook, you can use this link to get 50% off which makes it just $20 per month.
A really important part of your brand is the client experience. In fact, 90% of the client’s decision to stay with your company long term is made between your first TWO interactions with them. And in today’s busy environment, it’s all the more vital that you find a way to impress the heck out of those clients and make a lasting first impression that will rise above the noise of everyday business.
The best way to ensure a seamless and impressive client experience is to create it. I have carefully crafted my client onboarding and post launch experiences using a client relationship management tool called Honeybook. You can use any type of client relationship management (CRM) tool to create a client experience, but I have not found one better than Honeybook for a truly beautiful and enjoyable experience from the client’s perspective.
Today we will cover the tools and techniques I used within Honeybook to set up my client onboarding process and we will also cover how to create a Client Welcome Magazine and import it into Honeybook for a truly immersive first impression for new clients.
Honeybook client onboarding workflow
If you are new to Honeybook, you may not be aware of all the tools they offer. From website contact forms, workflows, email templates, invoicing, contracts, payment, and more, Honeybook is literally a one-stop shop for pretty much every client related process you would ever need. I do all my client work within Honeybook, meaning all my client interactions are within one system, which has really cut down on me trying to sift through hundreds of emails everyday. Everything I need is all right within reach and easy to manage for both me and the client. Let me show you a bit more how the system works and is set up.
Step 1: The Client Inquires On Your Website
Instead of using the contact form from your website platform like Squarespace or Showit, I embed my customized and branded Honeybook form directly onto my Contact Page. This way I am able to ask the exact questions I want and the client is immediately added to my pipeline once they submit the form. It looks like this on the website:
Step 2: Send An Automatic Welcome Email
They are immediately sent a welcome email as part of my onboarding sequence. You can see that set up in the workflow here:
This email is sent without needing my personal input or time. It thanks them for their inquiry, invites them to schedule an initial call, and gives them some details about our company. This gives the client a great first impression and also saves me a ton of time from having to individually respond to online inquiries.
Step 3: Send Contract + Invoice
If after our initial call, the client and I decide to work together, the next step is to send out a formal proposal, invoice, and contract. All this is done through Honeybook (and Honeybook even connects with Quickbooks for making your books easier to manage!)
Within the proposal, everything is able to be branded to your business. You can also make payment arrangements and clients can set up their choice of payment and sign the contract right in the same place. You are notified of each step they take, so you know if they viewed your proposal, signed it, and paid.
From the client’s end, the process is seamless. The reason I actually joined Honeybook is because I experienced it as a client and wanted to know what the vendor used to make such a beautiful experience! Here is what the client sees when they are sent the proposal:
After the client pays their invoice, the next step in the workflow is to send them a Client Welcome Magazine. In the next section, we will be diving into what a client welcome magazine is and how to set one up for your business.
Creating a client welcome magazine
The Client Welcome Magazine is a custom designed and branded reference for the new client. I have designed it as a way to give them a warm welcome, set the tone for the quality they can expect with our brand, and answer the questions they likely have since our first call. I have found that a lot of companies drop the ball at this part of a client process, since they feel they have “won” the client and no longer need to impress and this couldn’t be further from the truth. I believe that every step is important and a client should feel that from the first call to the final send off.
The parts I have included in my Welcome Magazine are:
-
Frequently Asked Questions
-
Instructions on How To Compile Content (part of our work together)
-
5 Tips for A Flawless Design Process
-
Overview of the Process + Schedule
What you might include in your Welcome Magazine will vary depending on what makes sense for you and your business. Our Welcome Magazine is created in InDesign and saved as a PDF. From there I imported it into Honeybook and save it as a brochure, so it is easy to send as an email to clients.
This is just the first four parts of my on-boarding sequence, which is 20 steps total! I also have created client off-boarding (or post-launch) sequences to create a great experience from start to finish! If you are interested in trying Honeybook, you can use this link to get 50% off which makes it just $20 per month.
How I Onboard New Clients Using HoneyBook
How I Onboard New Clients Using HoneyBook
How I Onboard New Clients Using HoneyBook
How I Onboard New Clients Using HoneyBook
How I Onboard New Clients Using HoneyBook
How I Onboard New Clients Using HoneyBook
Recently on the blog
Clients seen in


Gray Aspen
Gray Aspen
Thirty One | Twenty One Home
EXPLORE OUR WORK
Gray Aspen
Thirty One | Twenty One Home
Gray Aspen Interiors
Thirty One | Twenty One Home
Jamie Naugle Interiors
Fiore Home Fragrance
Southern Vintage
Casey Wood Design
Casey Wood Design
Millard


")


